


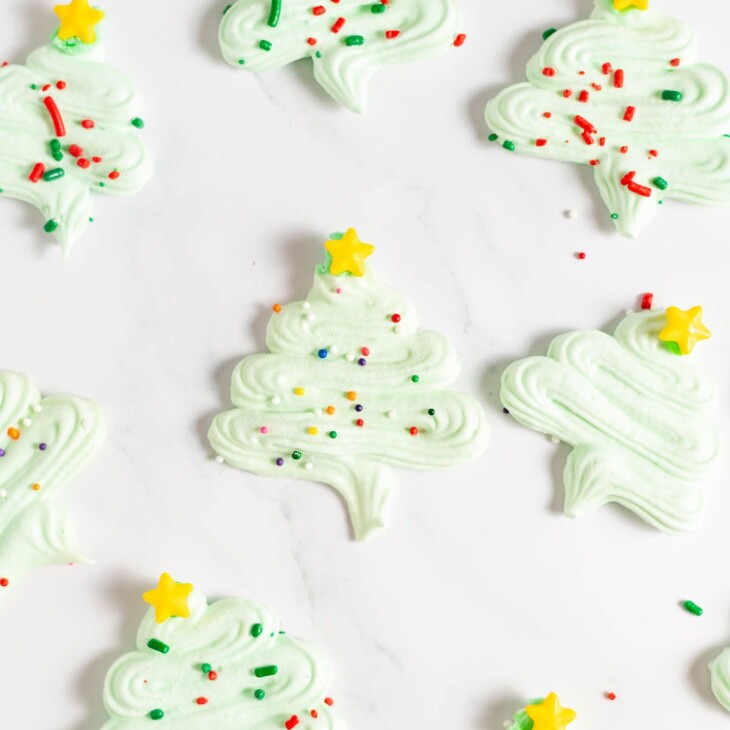
These festive snowy Christmas tree cookies are easy to make even if you’ve never used royal icing before! They’re a great project for kids to help with and a beautiful addition to any holiday cookie tray.

It seems like every family has their own unique Christmas cookie lineup; some people make Peanut Butter Blossoms, others make Red Velvet Crinkle Cookies. But decorated cutout cookies—like these Christmas tree cookies—seem to be the one type of cookie that everyone makes.
While it’s hard to resist that classic sugar cookie base, the real appeal lies in their festive shapes and colors. They instantly put me in the holiday spirit!
Now, Santas and snowflakes may take some skill, but if you want the best cutout cookie to start out with, these Christmas tree cookies are just the thing. They’ll definitely bring some festive cheer to your home and they’re the perfect combination of fun and deliciousness.

Table of Contents
Why You’ll Love
- A great way to get started with royal icing – If you’ve been intimidated to try your hand at decorating with royal icing, these cookies are a great way to get started. The design is simple, allowing you to get a good feel for how to work with this more professional icing option.
- Fun for kids – The Christmas season is all about spending quality time with family, and these cookies are the perfect activity for kids of all ages. Let them decorate their own trees however they like!
- Customizable – While I’ve decorated these cookies with royal icing, you can use any frosting or sprinkles you have on hand.
- A handful of simple ingredients – With just a few basic pantry staples, you can make these holiday cookies. No need to run out and buy anything fancy!
Ingredients and Substitutions

- All-purpose flour – Lightly spoon this into the measuring cup; if you scoop it, you’ll compact the flour and end up using more than you need.
- Salt – To enhance the flavor of the finished cookies.
- Unsalted butter – Unsalted butter gives you more control over the salt level in these Christmas tree cookies.
- Superfine sugar – This is also sometimes labeled as baker’s sugar or caster sugar.
- Eggs – If you let the eggs come to room temperature, they’ll hold more air when creamed with the sugar.
- Almond extract – Almond extract has an amazing cherry-like flavor and aroma, and it’s the secret ingredient in many bakery-style sugar cookie recipes.
For the Royal Icing:
- Egg whites – You can use the yolks for another holiday cookie recipe or freeze them for later.
- Confectioners’ sugar – AKA powdered sugar.
- Green gel food color – Gel food coloring allows you to get an intense color without adding excess liquid to the icing.
Variations
- To make these gluten-free Christmas tree cookies, simply swap out the all-purpose flour for a measure-for-measure gluten-free flour blend.
- If there’s another type of icing you prefer to use, feel free to switch it up! Cream cheese frosting, buttercream, or even a simple tinted glaze would all taste delicious on these cookies.
- Making these with kids? You can spread green buttercream icing over the entire cookie and use mini M&Ms, sprinkles, and cinnamon candies for easy decorating options.
- You can add a teaspoon of vanilla extract to the icing if you’d like.
Helpful Tools
- Electric Mixer – Whether it’s a stand mixer or a hand mixer, this will make mixing the cookie dough and royal icing a breeze.
- Rolling Pin – A must-have for rolling out the cookie dough to the perfect thickness.
- Christmas Tree Cookie Cutter – This is what makes these cookies so special! A cutter with a triangle top and stem is easier to work with than a cutter with branches, so if you’re making these with kids and they want to help with the cutting, you might want to go with the simpler option!

How to Make the Christmas Tree Cookies
- Prepare – Preheat your oven and line your baking sheet with parchment paper.
- Mix the Dry Ingredients – Sift together the flour and salt into a bowl.
- Cream the Butter and Sugar – Mix them with a hand mixer or stand mixer on medium speed.
- Finish the Wet Ingredients – Beat in the eggs one at a time, followed by the almond extract.
- Combine Wet and Dry – Add the flour mixture to the dry ingredients in batches.
- Chill – Press the dough into a disc, wrap it, and refrigerate for an hour.
- Form the Cookies – Roll out the dough and cut it with the Christmas tree cookie cutter. Re-roll the scraps and continue cutting until all the dough is used.
- Bake – Place the cookies on the baking sheet and bake for 12 minutes.
- Cool – Let the cookies cool on the baking sheet for 5 minutes, then transfer them to a wire rack to finish cooling.
Make the Royal Icing
- Beat the Egg Whites – Use a hand mixer or stand mixer to beat the whites until they’re foamy.
- Add the Sugar – Lower the speed and beat in the sugar in batches until stiff peaks form.
- Color – Divide the icing into 2 portions. Leave one part white and tint the other part with green gel food color until you get desired shade. Reserve 1/4 of each and add a teaspoon or two of water to the rest.
- Prepare – Transfer all 4 of the icings to piping bags.
- Add the Green Icing – Outline the cookies with the thick green icing first, then flood the cookies with the thinner green icing. Spread the icing with a toothpick and let this set.
- Add the White Icing – Use the white icing to add circles.

Shortcuts
- If you’re short on time, use pre-made sugar cookie dough to cut out the Christmas tree shapes.
- You can also buy royal icing mix and tint it for an easier frosting option.
- For simpler decorating, use the green royal icing as a background and while it’s still wet, add festive sprinkles.
Tips
- Don’t overmix the dough or it may become tough. Once all the flour is just incorporated, stop mixing.
- For perfect Christmas tree shapes, dip the edges of your cookie cutter in flour before cutting out each cookie.
- Allow the cookies to cool completely before decorating with icing. This will prevent the icing from melting or running off the cookies.
- Wait for the base icing to dry completely before decorating the cookies with white icing. This will keep the colors from bleeding.
How to Store
Room Temperature – You can store Christmas tree cookies in an airtight container for 1-2 days at room temperature.
Refrigerator – For longer storage, you can keep these cookies in the refrigerator for 3-4 days in an airtight container.
Freeze – You can also freeze the cookies for up to 3 months. Just wrap them tightly in plastic wrap and place them in a freezer-safe container or bag. To thaw, simply leave them at room temperature for a few hours before enjoying.

Frequently Asked Questions
There are many ways to decorate Christmas tree cookies. You can use royal icing, as I do here, or buttercream frosting, store-bought frosting, or even melted white chocolate. Use food coloring to create different colors and add sprinkles, candies, or other edible decorations for some festive flair.
If you don’t have a Christmas tree cookie cutter, you can still make festive cutout cookies. Simply use a knife to cut out the desired shape or create your own template using cardboard or thick paper, then trace around it with a knife.
The main difference between royal icing and regular icing is the texture. Royal icing hardens when dry, making it perfect for detailed decorating on cookies and cakes. Regular icing is usually softer and smoother in texture, making it ideal for covering cakes or piping onto cupcakes. While some buttercream will form a “crust” when it dries on a cookie, it’s still more prone to smearing than royal icing.
Royal icing needs about 1-2 hours to set completely, although this depends on the amount you use and its consistency. It’s best to wait at least 8 hours before handling or packaging decorated cookies to make sure the icing is dry and won’t smudge or break when touched.

More Christmas Cookies


Christmas Tree Cookies
Ingredients
- 4 cups all-purpose flour, 480 grams
- ¼ teaspoon salt
- 1 cup unsalted butter, 226 grams (room temperature)
- 1 ½ cups superfine sugar, 250 grams
- 2 eggs
- 2 teaspoons almond extract
Royal Icing:
- 3 egg whites
- 4 ½ cups confectioners’ sugar – 16 oz, 450 grams
- Green gel food color
Instructions
- Preheat your oven to 350 F / 180 C and line your baking tray with parchment paper and keep aside.
- In a large bowl, sift the dry ingredients flour, and salt together, mix, and keep aside.
- In a stand mixer (you can also use the hand mixer for this) add in the butter, and sugar, and beat it at medium speed, scraping down the sides for at least 2-3 min or until the mixture is creamy.
- Add in the egg one at a time along with almond extract and beat until everything is incorporated well.
- Add the flour mixture to the butter mixture in batches and mix till the dough is formed (the dough should pull away from the sides of the bowl).
- Flatten the dough to form a disc and wrap it with a cling wrap and refrigerate for at least an hour.
- Once chilled, roll out the dough on a lightly floured surface to 1/4-inch thickness and cut out Christmas Tree shapes using a Christmas Tree cookie cutter.
- Place the cut-outs on the prepared baking tray and bake for at least 12 min in a preheated oven.
- Let the cookies cool for 5 minutes in the baking tray before transferring them to a wire rack to cool completely.
ROYAL ICING:
- Pour the egg white into a stand mixer fitted with a whip attachment and beat on high till it foams up. (You can also use a hand mixer)
- Lower the speed and add the sugar in batches and beat till the mixture becomes thick and starts to hold peaks.
- Divide the icing into 2 parts. Leave one part as it is (white) and tint the other part with green gel food color until you get desired shade.
- Now, reserve 1/4th of both the green and add 1-2 tsp of water to the remaining icing and mix well to make it a little thin.
- We will use thick icing to make the border around the cookies (Because it’s thick and as no water has been added it will hold its shape well), and thin icing to cover the cookies completely.
- Put all the icings in different icing bags.
- Outline the cookies with the thick green icing first, keeping a little space on the edges of the cookies. Then flood the cookies with the thinner green icing; use a toothpick to spread the icing so it’s evenly filled.
- Let the green icing set (dry) entirely before decorating further.
- Now use white icing to make different sizes of circles on the cookies as I have done. Let it set completely.
Notes
- You can store CHRISTMAS TREE GREEN/WHITE COOKIES in an airtight container for 1-2 days at room temperature or for 3-4 days in the refrigerator.
- You can make the cookies ahead and decorate them later whenever you have time.
- You can add 1 tsp of vanilla extract to the icing for an added flavor if you like.
- Wait for the base icing to dry up completely before decorating the cookies with white color because the colors will mix with each other and spread if the background is still wet.
- If you are not into fancy decorating then you can just make the background on cookies and sprinkle some Christmas sprinkles randomly over the cookies while the icing is wet.
Leave a Comment